
Menus help visitors find your pages. Here is how to create one and choose where it appears on your site.
Understanding the Importance of Good Navigation
Before building a menu, decide which pages visitors need most:
- Improves user experience
- Reduces bounce rates (when people leave the page right away)
- Helps search engines understand your site structure
- Increases the likelihood of visitors exploring more pages
Steps to Set Up Menus and Navigation
1. Plan Your Menu Structure
Before you start building, sketch out your desired menu structure. Consider:
- Main categories
- Subcategories
- Important pages that need to be easily accessible
2. Access the Menu Builder
In Quick Elements:
- Log into your dashboard
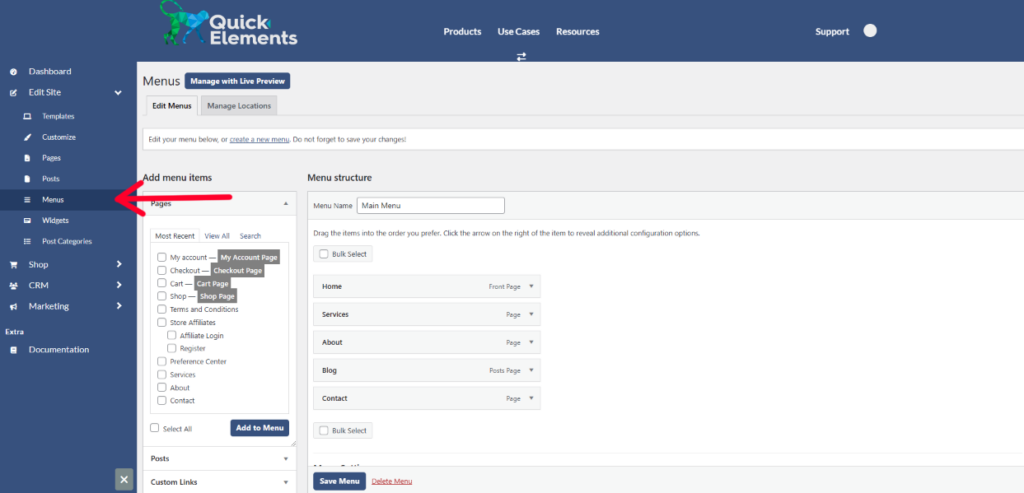
- Click on “Menus” in the sidebar under “Edit Site”, and then click on the menu you want to edit or click “Create a New Menu”
3. Create a New Menu, or Select an Existing One
- Give your menu a name (e.g., “Main Navigation” or “Footer Menu”)
- Start adding items to your menu
4. Add Menu Items
You can add various types of content to your menu:
- Pages
- Posts
- Custom links
- Categories
To add an item:
- Select the content type from the left sidebar
- Choose the specific page, post, or category
- Click “Add to Menu”
5. Organize Your Menu Structure
- Drag and drop menu items to rearrange them
- Create dropdown menus by indenting items under a parent item
6. Set Menu Location
Quick Elements offers predefined locations for menus, such as:
- Primary Menu (in the header)
- Footer Menu
- Sidebar Menu
Select where you want your menu to appear.
7. Save and Publish
Don’t forget to save your changes and publish your menu!
Advanced Tips
Consider using a “sticky” menu that stays at the top of the screen as users scroll.
- To do this, click on “Customize” -> “Header” -> “Headers” -> “Global Header” & select the options you want (sticky, row selection, effects, offset, transparent, etc)
- On this page, you can also adjust your header, including your logo, buttons, etc.