
The Quick Elements Block Editor lets you add text, images, products, and other content to a page one block at a time.
What Is the Quick Elements Block Editor?
A block is one piece of a page, such as a paragraph, image, button, or product listing. Add blocks in the order you want them to appear, then edit each one.
What you can do with blocks
- Add text, images, videos, forms, and other content to a page.
- Move blocks to change their order and edit their settings in the sidebar.
- Preview the page on a phone before publishing.
Getting Started
Accessing the Quick Elements Block Editor
Open a page or post from your website dashboard to start editing:
- Go to the Quick Elements website.
- Hover over the “Products” menu item.
- Hover over the “Websites” section.
- Go to either ”Pages” or ”Posts”.
- Click on the page or post you want to edit, or click “Add New”.
- The block editor will appear.
Understanding the Interface
The Main Editing Screen
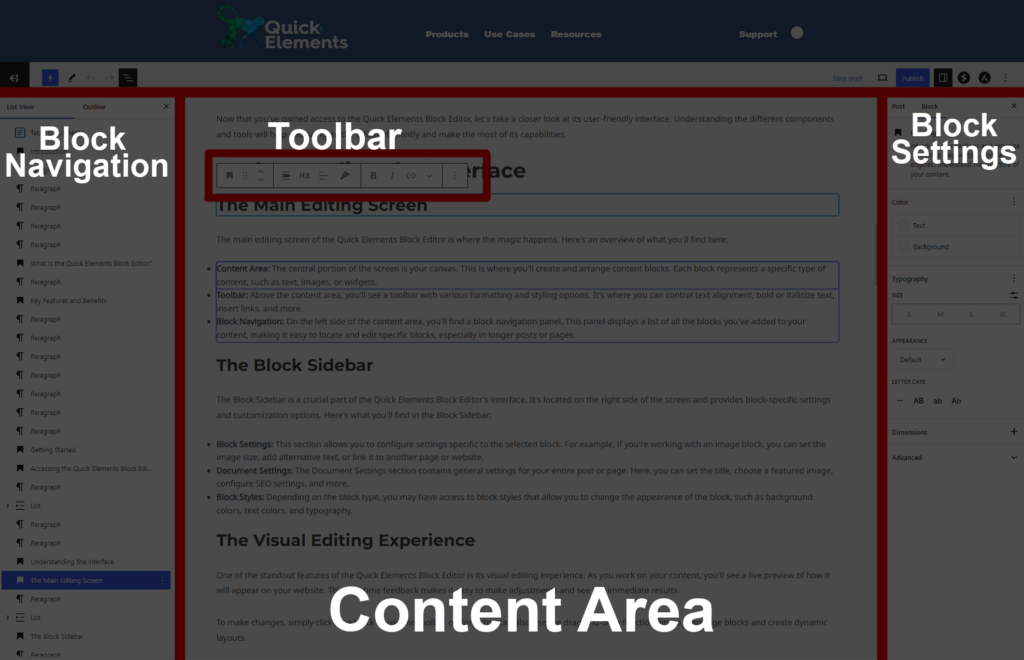
The editor has three main areas:
- Content Area: The central portion of the screen is your canvas. This is where you’ll create and arrange content blocks. Each block represents a specific type of content, such as text, images, or widgets.
- Toolbar: Above the content area, you’ll see a toolbar with various formatting and styling options. It’s where you can control text alignment, bold or italicize text, insert links, and more.
- Block Navigation: On the left side of the content area, you’ll find a block navigation panel. This panel displays a list of all the blocks you’ve added to your content, making it easy to locate and edit specific blocks, especially in longer posts or pages.
The Block Sidebar
The sidebar on the right shows settings for the block you have selected:
- Block Settings: This section allows you to configure settings specific to the selected block. For example, if you’re working with an image block, you can set the image size, add alternative text, or link it to another page or website.
- Document Settings: The Document Settings section contains general settings for your entire post or page. Here, you can set the title, choose a featured image, configure SEO settings, and more.
- Block Styles: Depending on the block type, you may have access to block styles that allow you to change the appearance of the block, such as background colors, text colors, and typography.
The Visual Editing Experience
As you edit, you can see how the page will look. Preview it before publishing to check spacing and layout.
To make changes, simply click on a block or use the toolbar options. You can also use the drag-and-drop functionality to rearrange blocks and create dynamic layouts.
Save and Preview
Save a draft if the page is not ready to publish. Use Preview to check it first.
Creating and Editing Content
Add a block, choose its type, then fill it with your content.
Adding Blocks
To add a block:
- Create a New Block: To add a new block, simply click the “+” button, which you can find at the top left of the editor or between existing blocks. A block selector will appear.
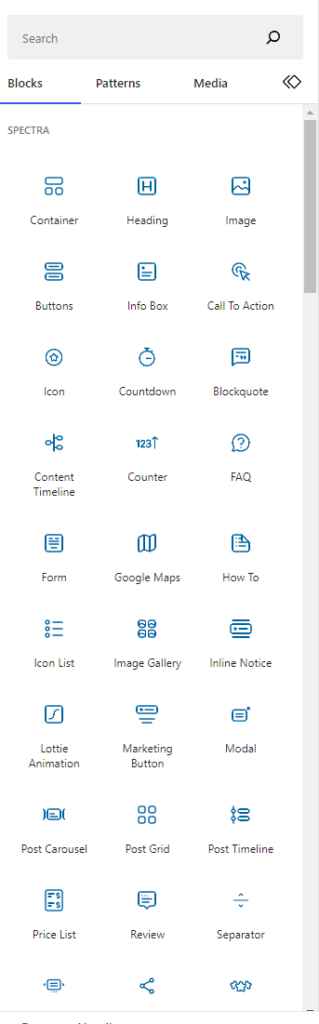
- Choose a Block Type: Browse through the available block types or use the search bar to find the one you need. You can select from common blocks like paragraphs, headings, images, videos, and more.
- Insert the Block: Click on the desired block type to insert it into your content. The block will appear within your editing canvas, ready for you to fill in with content.
Editing Blocks
Once you’ve added a block, you can start editing and customizing it to suit your needs. Here’s how to edit and format blocks:
Text Blocks
- Typing and Editing: Click within a text block to start typing or editing text. You can use the toolbar to format text, such as making it bold or italic, creating lists, and adding links.
Image Blocks
- Uploading Images: Click on an image block to upload an image from your computer or select one from your media library. You can also customize image settings like alignment, size, and alt text.
Video Blocks
- Embedding Videos: For video blocks, you can embed videos from popular platforms like YouTube or Vimeo by pasting the video’s URL. You can adjust video dimensions and alignment as needed.
Other Blocks
- Customizing Blocks: Depending on the block type, you’ll have specific customization options in the Block Sidebar. This could include adjusting colors, layouts, and more.
Drag-and-Drop
- Rearranging Blocks: You can easily change the order of blocks by clicking and dragging them within the editing canvas. This allows you to create dynamic and visually appealing layouts.
Organizing and Managing Content
You can change a page by moving blocks and editing their settings.
Rearranging Blocks
To change the order of blocks:
- Select the Block: Hover over the block you want to move, and you’ll see a toolbar icon with arrows. This icon indicates that the block is selected.
- Drag and Drop: Click on the block’s toolbar icon and drag it to the desired location within your content. Release the mouse button to drop the block in its new position.
- Fine-Tune Placement: You can also use the up and down arrow icons that appear when you hover over a block to fine-tune its placement.
Managing Block Properties
The options in the right sidebar change with the selected block. To edit them:
- Select the Block: Click on the block you want to modify to select it. The Block Sidebar on the right will display options specific to that block type.
- Customize Block Settings: Use the Block Sidebar to adjust settings like block alignment, text color, background color, and more. The available options will vary depending on the block type.
- Advanced Settings: In some cases, you may find additional advanced settings that allow you to fine-tune block behavior. For example, for image blocks, you can set a link, caption, and image size.
- Preview Changes: As you make changes to block properties, the live preview in the editor will update in real-time. This helps you ensure your content looks as intended before publishing.
Advanced Tips and Tricks
These shortcuts and settings can help when you edit longer pages.
Keyboard Shortcuts
Common keyboard shortcuts include:
- Ctrl + C (or Command + C on Mac): Copy selected content.
- Ctrl + X (or Command + X on Mac): Cut selected content.
- Ctrl + V (or Command + V on Mac): Paste copied or cut content.
- Ctrl + Z (or Command + Z on Mac): Undo your last action.
- Ctrl + Shift + Z (or Command + Shift + Z on Mac): Redo an action (undo the undo).
- Ctrl + A (or Command + A on Mac): Select all content within a block.
- Ctrl + S (or Command + S on Mac): Save your changes.
- Ctrl + Shift + D (or Command + Shift + D on Mac): Duplicate a block.
Using Reusable Blocks
Save a block you use on several pages, such as a sign-up form or button:
- Create a Block: Select a block that you want to make reusable. In the Block Sidebar, click the three dots menu and choose “Add to Reusable Blocks.”
- Name Your Reusable Block: Give your reusable block a descriptive name for easy identification.
- Insert the Reusable Block: To use your reusable block in other posts or pages, click the “+” button, and under the “Reusable” tab, you’ll find your saved blocks. Select one to insert it into your content.
This feature is handy for elements like call-to-action buttons, subscription forms, or any content you want to maintain consistency across your website.
Custom CSS
If you know CSS, you can add a class to a block and style it yourself:
- Select a Block: Choose the block you want to apply custom CSS to.
- Block Settings: In the Block Sidebar, under the “Advanced” section, you’ll find a field labeled “Additional CSS class.” Enter your custom CSS class here.
- Apply Styling: In customize->Additional CSS, you can define styles for your custom CSS class to achieve the desired look for that block.
Remember to exercise caution when using custom CSS to ensure it doesn’t conflict with your website’s overall styling.
Types of Blocks
These are some of the blocks you can add to a page:
- Text Block: Allows you to add and format text content, including headings, paragraphs, lists, and more.
- Image Block: Lets you insert images into your posts or pages and customize their appearance and alignment.
- Video Block: Allows you to embed videos from platforms like YouTube and Vimeo, providing a visual element to your content.
- Audio Block: Similar to the video block but for embedding audio files or podcasts.
- Gallery Block: Enables you to create image galleries with multiple images displayed together in a grid or slideshow format.
- Button Block: Adds call-to-action buttons with customizable text, links, and styles.
- Quote Block: Used for highlighting quotes or testimonials, with options for attribution and styling.
- Spacer/Divider Block: Provides space or a visual divider between content sections.
- Embed Block: Lets you embed content from various sources like social media posts, Google Maps, and more using embed codes.
- Table Block: Allows you to create tables for presenting data in a structured format.
- Heading Block: Adds headings to your content with different levels (h1, h2, h3, etc.) for structuring your text.
- Custom HTML Block: Offers the flexibility to add custom HTML code for advanced customization.
- Code Block: Specifically designed for displaying and formatting code snippets with syntax highlighting.
- Reusable Blocks: Blocks you’ve saved for reuse across multiple posts or pages.
Store pages can also use these blocks:
- Product Block: Displays individual products from your store with details like title, price, and a “Buy” button.
- Product Categories Block: Lists product categories, allowing customers to browse specific product groups.
- Featured Product Block: Highlights a specific product as a featured item.
- Best Sellers Block: Showcases your best-selling products to encourage more sales.
- Cart Block: Displays the contents of a customer’s shopping cart, making it easy for them to review and proceed to checkout.
- Checkout Block: Simplifies the checkout process by enabling customers to complete their purchase directly from a block.
- Product Search Block: Adds a product search bar to help customers find specific items quickly.
- Product Reviews Block: Shows customer reviews and ratings for products, building trust among potential buyers.
Start with a simple page, preview it on a phone, then add more blocks as you need them.
Additional Resources
- Quick Elements Blog: Stay updated with the latest news, tips, and tutorials related to Quick Elements on their official blog. Quick Elements Blog
- YouTube Tutorials: Video tutorials can be a great way to learn how to use the Quick Elements Block Editor visually. Visit Quick Elements on YouTube to find various guides and walkthroughs.
- Quick Elements Support: If you encounter any issues or have specific questions, consider visiting the Quick Elements support. There, you can ask questions. Quick Elements Support
- Email Newsletter: Subscribe to our email newsletter to receive regular updates and tips in your inbox.