
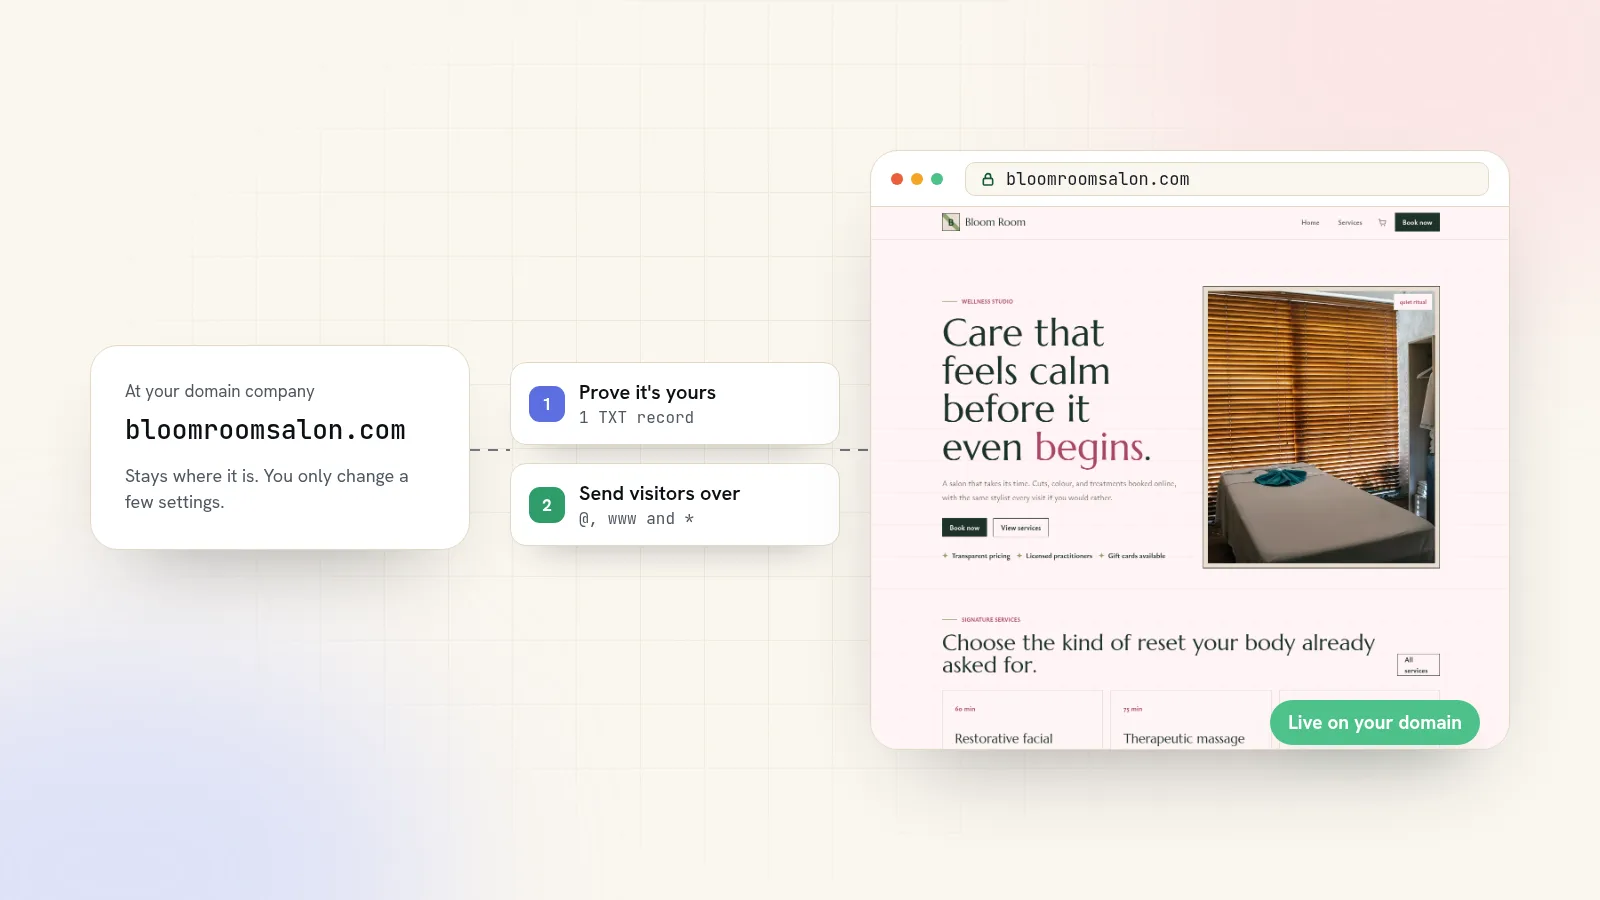
To connect a domain you already own to a new website, you don't move the domain anywhere. You sign in at the company you bought it from, open its DNS settings, and change two or three records so your name points at the new site. Most website builders also ask for one extra record that proves the domain is yours. The work takes about fifteen minutes, and the change usually shows up within an hour.
This guide walks through each step in plain words, shows what to type at the big domain companies, and covers the mistakes that leave a site half-connected or knock out your email.
Connecting a domain is not the same as transferring it
People often think they have to move their domain to the new website company. You don't. There are two different jobs here:
- Connecting means changing a few settings so your name sends visitors to the new website. The domain stays where it is, and you keep renewing it there.
- Transferring means moving the registration itself to another company. It takes longer, it involves unlock codes and approval emails, and it isn't needed to use the domain on a new site.
Connect first. If you later want everything billed in one place, you can transfer the domain once the new site is running. Moving from another website builder? Read how to switch website builders without losing SEO before you change anything.
What you need before you start
- The login for wherever you bought the domain. If you can't remember, search your inbox for the domain name plus "renewal" or "receipt". The company that bills you is the one that holds the settings.
- The records your new website gives you. Your new website company shows these during setup: usually one record to prove ownership and two or three that point the name at the site.
- A note of your email records, if you have email on this domain. Take a screenshot of the settings page before you change anything. You won't need to touch the email records, and the screenshot means you can put things back if anything goes wrong.
One special case: if you bought the domain through your old website builder, its settings usually live inside that builder's dashboard, not at a separate domain company. You change the records there in the same way.
DNS records in plain words
DNS is the internet's address book. When someone types your domain, their browser looks it up to find out where your website lives. Each line in that address book is a record. You will only meet four kinds:
| Record | What it does | Where you'll see it |
|---|---|---|
| TXT | A short note anyone can read. Website and email companies ask for one to confirm you control the domain. | Proving the domain is yours |
| CNAME | Points a name at another name, like "send www.yourbusiness.com wherever this address goes". | Pointing www at your new site |
| A (or ALIAS) | Points a name at a numbered address (an IP address). ALIAS and ANAME work like a CNAME but are allowed on the bare name. | Pointing the bare name at your new site |
| MX | Says where email for the domain should be delivered. | Email. Leave these alone. |
Step 1: Prove the domain is yours
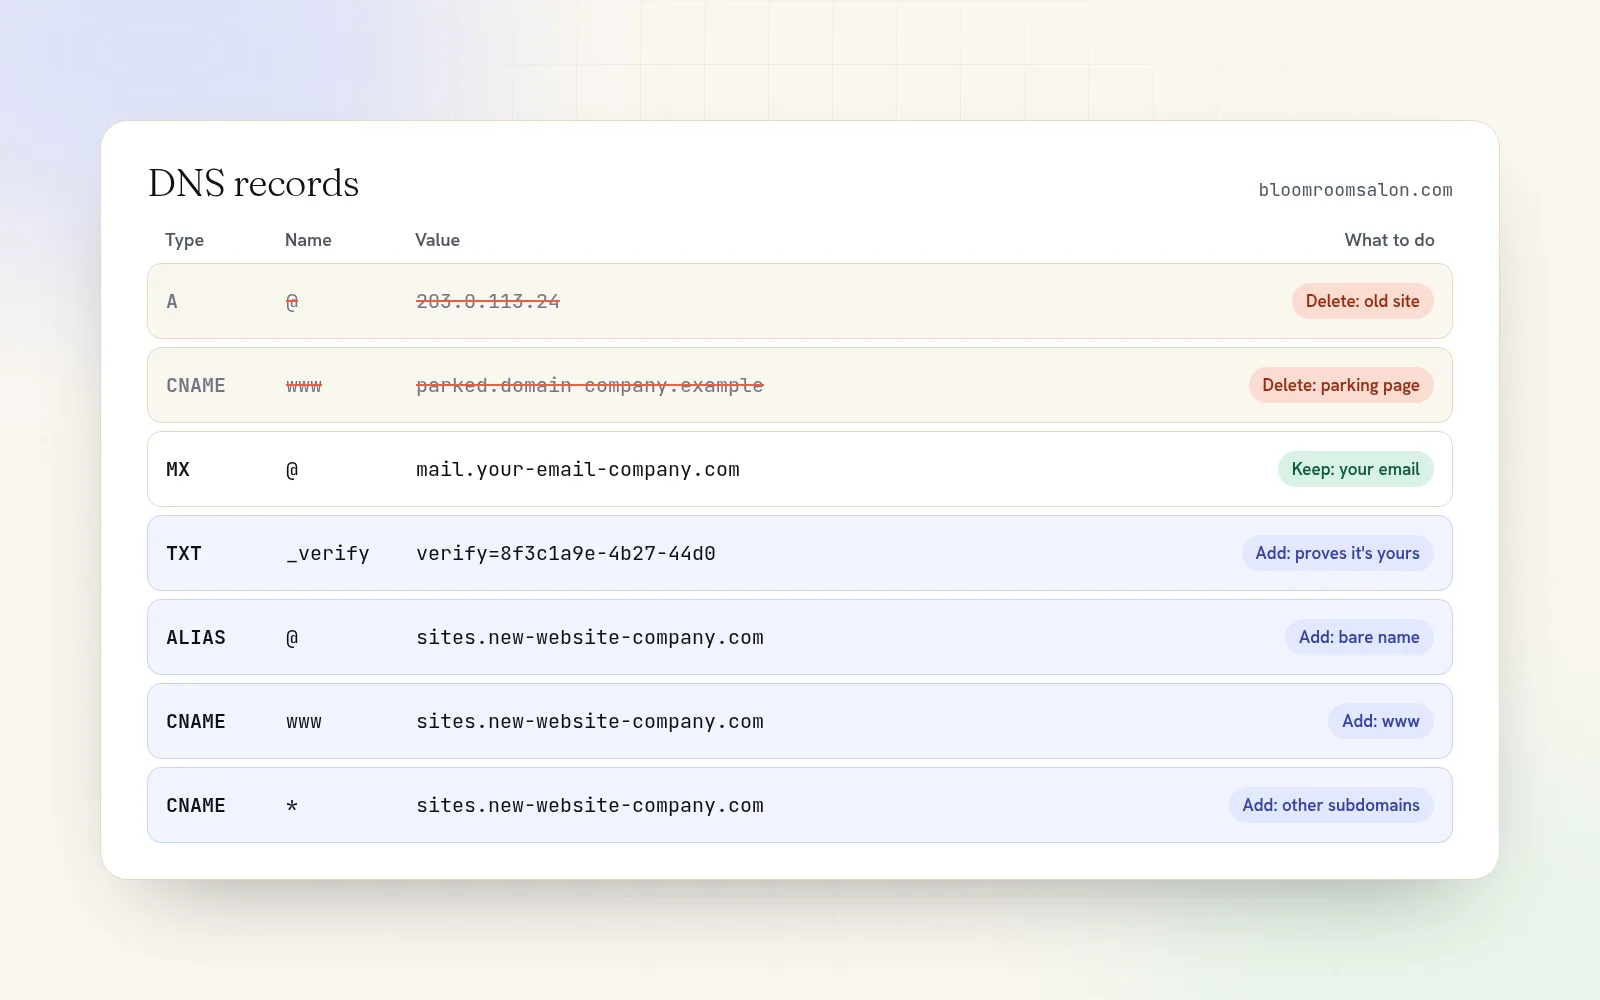
Your new website company gives you a TXT record with a name and a long value. Add it at your domain company:
- Open your domain's DNS settings. Each company names this page a little differently: "DNS", "Manage DNS", "Advanced DNS" or "DNS records".
- Choose "Add record" and set the type to TXT.
- Copy the name and the value exactly. Copy and paste rather than typing; one wrong character and it won't match.
- Save, then go back to your new website and press its check button.
A common trip-up: many domain companies add your domain to the end of the name for you. If you're told to use a name like _verify and you type _verify.yourbusiness.com, some companies save it as _verify.yourbusiness.com.yourbusiness.com, and the check fails. Type only the part you were given.
Step 2: Point the name at your new website
This is the step that actually sends visitors to the new site. You need both versions of your address to work, so people who type www and people who don't both land in the right place.
- Delete the old records for @ and www. Look for any A, AAAA or CNAME records with the host @ (sometimes shown as your domain name) or www. These are what still send visitors to your old site or to a "parked" page. Leave MX and other TXT records where they are.
- Add the new record for www. Usually a CNAME pointing at the address your new website company gives you.
- Add the new record for the bare name (@). Most domain companies won't accept a CNAME on @. Use an ALIAS or ANAME record if they offer one, or an A record with the number your website company provides.
When a site looks connected for some people and not for others, a leftover old A record is usually why. Two records for the same name means visitors get sent to one or the other at random.
GoDaddy
Open "My Products", choose the domain, and open its DNS records. GoDaddy won't take a CNAME on @, so find the A record named @ (its value may say "Parked") and change its value to the number your website company gives you. Delete any other A or AAAA records named @. Then edit the CNAME named www so it points at your new site, or add one if it's missing.
Namecheap
Go to "Domain List", click "Manage" next to the domain, and open "Advanced DNS". Delete the records Namecheap added for @ and www, which are usually a "URL Redirect Record" and a CNAME pointing at a parking page. For @, add an ALIAS Record. For www, add a CNAME Record. Click the green tick to save each one.
Cloudflare
Choose the domain and open its records. Delete the A, AAAA and CNAME records for @ and www, then add your new ones. Cloudflare accepts a CNAME on @. Set "Proxy status" to DNS only (the grey cloud). With the orange cloud on, your new website company sees Cloudflare instead of your site, and the check or the security certificate can fail.
Step 3: Wait, then check it worked
DNS changes don't land everywhere at the same moment. Each record carries a number called TTL, which tells networks how long they may remember the old answer. Most changes show up within minutes to an hour; a few networks can take up to 48 hours to catch up.
To check:
- Visit both yourbusiness.com and www.yourbusiness.com, ideally on your phone with Wi-Fi turned off, since your computer may remember the old site.
- Look for the padlock beside the address. A security warning right after connecting usually means the certificate hasn't been issued yet. Most website companies request it automatically once both addresses point at them.
- Send yourself an email at the domain to confirm mail still arrives.
Don't break your email
Connecting a website only changes the records for @, www and sometimes *. Your email runs on MX records, plus a few TXT records with names like SPF and DKIM. None of these need to change to connect a website.
Email goes wrong when someone deletes every record to "start clean", or switches the domain's nameservers to a new company without copying the email records across. If your new website company asks you to change nameservers rather than add records, copy every MX and email-related TXT record to the new company first. Adding records, as described above, avoids the problem entirely.
Common problems and how to fix them
The old site still shows up
Check for a leftover A or AAAA record on @ or www. Then wait an hour and try on a different device. If it's still the old site, the records are almost always the cause.
www works but the bare name doesn't (or the other way round)
You've set up one record and not the other. Both need to point at the new site.
The ownership check keeps failing
Compare the TXT name and value character by character, and check your domain company didn't add the domain to the end of the name twice. Give it ten minutes after saving before you check again.
I can't find the DNS settings
Some companies hide them under "Nameservers" or "Advanced". If the domain uses another company's nameservers, the settings live at that company instead. The nameserver names usually tell you which one.
Connecting a domain to Quick Elements
On Quick Elements, connecting is part of setting up your website. When you reach "Pick your web address", choose I bought one elsewhere and type your domain. The setup page then shows exactly what to add where you bought it:
- Show us it's yours: one TXT record.
- Send visitors to your website: records for your bare address, the www version, and every other subdomain, with step-by-step instructions for GoDaddy, Namecheap, Cloudflare and everywhere else, including what to use where a company won't take a CNAME.
You don't have to sit and refresh. We check every minute, and as soon as both versions of your address lead to us, we build your website in about two minutes and request its security certificate for you. If a step won't go through, get in touch and we'll set it up with you.
And if you'd rather skip DNS altogether, every plan includes a .com or .org domain at no extra cost. Buy it with us and we handle every record, including the ones your email needs. See how it works on the domains page.
Get your domain working today
A domain sitting on a parked page earns you nothing. With Quick Elements you keep the name you already own, follow instructions written for your exact domain company, and get a finished website on it the moment the records land: design, booking, online payments, email on your domain and the security certificate, under one plan. If you haven't settled on a name yet, read how to choose a domain name first, then pick a plan and connect it in the same sitting.